Kids First Saturdays: Making Faces
This week, we discover the fun of making faces by drawing with coloured media. This is the first of three activities that will be used to create your own mask and zine publication during our in-gallery Kids First programming on Saturday, November 7th 2020.
Advance registration for Kids First programming can be done by emailing kidsfirstsaturdays@thepolygon.ca and same-day registration should be done by telephoning the admissions desk at 604-986-1351. Our new Covid-19 plan ensures a safe experience for all.
For anyone visiting the gallery from September 4th to November 8th 2020, download and print this ‘Seek and Find’ document before your visit, to help you look closer at the artworks in the exhibition. Or, use your personal device to look at the sheet as you go through the exhibit with your family.
INSPIRATION
For the next several months, we will discover the artistic practice of 8 artists from the Third Realm exhibition. This week, let’s examine the series of photographs titled Extras (2010), by Chinese artist Yang Zhenzhong, where facial features hover between fiction and reality.

On the one hand, the highly detailed photographs show us happy, smiling faces that welcome us with their obvious display of emotion. Yet, when seen in person, these larger-than-life images give us a close look at the flaws most people try to hide: wrinkles, facial hair, freckles and birth marks that can sometimes make people feel self conscious.
But more than this visual sense of scale, the people in the images themselves are not quite what they seem. The men and women in the photographs were actually photographed alone in a studio as the artist instructed these actors to imagine a moment of joy from their lives. That means these are not candid snapshots of happy people, but in fact artificially constructed images.

In a similar way, we will be learning how to draw realistic faces, to eventually make different kinds of masks, as a way of exploring how the human face figures in contemporary art.
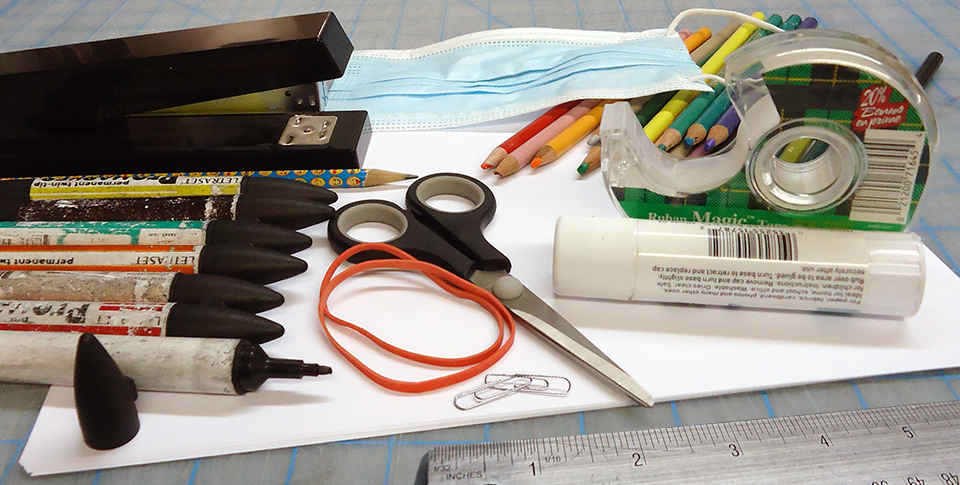
STEP 1: GATHER MATERIALS
- White drawing paper, full 8.5 X 11 inch sheets or cut in half to 8.5 X 5.5 inches
- A regular, HB pencil and eraser
- A set of colouring pencils (w/pencil sharpener)
- A set of thin, coloured markers
- Rubber bands or hair elastics
- A ruler
- A few paper clips
- Stick glue
- A stapler
STEP 2: TAKE THE TIME TO LOOK CLOSELY AT HOW FACIAL FEATURES ARE ALIGNED IN EVERY HUMAN FACE
If you take the time to compare the faces of different people, you will notice how the different parts of a face — eyes, nose and mouth — line up in very specific ways. In other words, these three main parts of the face are almost always placed at a predetermined distance from each other.
In the photograph below (a portrait of artist Yang Zhenzhong), certain distances or proportions have been outlined using different colours. For example, the red lines are there to indicate how the eyes are situated at the halfway point between the top of the head and the bottom of the chin. Hair and other facial hair can sometimes make this difficult to notice, but as a general rule, all people will have their eyes in this very specific place.
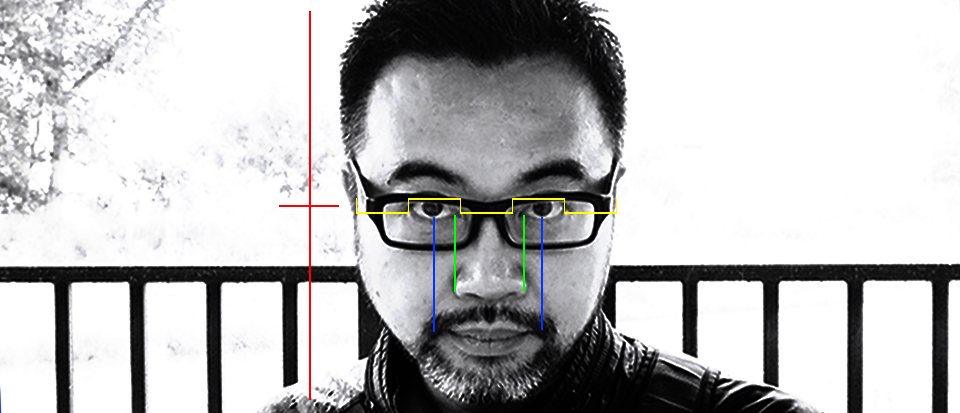
Next, the green lines show how the tear ducts align with the outside edges of nostrils. Someone may have what appears to be a ‘big’ or ‘small’ nose if the nostrils are either within or outside of this distance.
In a similar way, the centre of the eye or pupils will generally line up with the corners of the mouth, as demonstrated with the blue lines. And last of all, the size or width of one eye should easily divide the head, from left to right, into five even parts (yellow line), where the distance between both eyes should be the same as the width of one eye.
Knowing these guidelines is a great trick to remember how to draw a person’s face so that it looks realistic, making it easier to recognize the person you are drawing when putting the different parts of their face into the right place.
STEP 3: USING THESE GUIDELINES, DRAW THE THREE MAIN PARTS OF A PERSON’S FACE WITH AN HB PENCIL
When drawing a realistic face using a model (or a picture of yourself or your reflection in a mirror) always start by drawing one eye, as the horizontal length of the eye will determine the size of all other parts of the face.
Also, try not to think of the name of the parts you are drawing such as ‘eyelid’, ‘eyelash’ or ‘pupil’, but draw each detail as a series of separate lines. This will help you truly draw what is in front of you. For example, think to yourself: “This line is curved in this direction, and moves upwards a little bit. It crosses this line here, and connects with the other line at this point.”

Make sure to draw the eye where it should appear in your face, to the top left or right, depending on which eye you draw first. Once you’ve drawn the first eye, start drawing the second eye at exactly the length or distance of one eye away.

Drawing the nose and mouth is much easier when you know how the different parts of the face line up. The width of the nose should be the same as the distance between both tear ducts, and the nose is placed at a distance below the eyes with a similar distance to this separation.
The mouth is then found one eye-length below the nose, and its width should match up to where the centre of the pupils can be found. Place small measure marks on your paper before you start drawing each facial feature, and then draw each element within those boundaries.

For faces that have larger-than-the-norm features, use these guidelines to map out the face. And the guidelines can also help you draw faces that are seen at an angle, by tracking the direction of how features deviate from the standard placement, as in the image below.

STEP 4: USE COLOURED MARKERS AND PENCIL CRAYONS TO ADD COLOUR AND DETAILS TO YOUR DRAWING
Trace over the HB pencil lines using coloured markers. If you are comfortable, use the markers to directly draw the contour of the facial features while using the pencil marks as a guide. You can then use an eraser to remove the pencil lines. Use pencil crayons to add colour to the background of the image.

STEP 5: CUT, FOLD, GLUE AND STAPLE YOUR DRAWING TO MAKE A DISPOSABLE FACE MASK
Once you’ve finished colouring your line drawing, turn your image into a disposable face mask by folding the paper back so that the eyes disappear behind the area where the mouth and nose are drawn. This edge will be the top of your mask.

Tape an unfolded paperclip to the back of the image before using stick glue to keep the paper folded together. The paperclip will help keep the mask firmly on the bridge of your nose, as when wearing a pair of sunglasses.

Next, start making an ‘accordion’ fold where the upper lip begins. An ‘accordion’ fold is made by folding the paper back and forth several times, as when you’re making a paper fan.

Then, fold the mask down the middle vertically, so that the paperclip is bent over where the nose should be.

The final step to making a working disposable mask involves taping and stapling two rubber bands or cloth hair elastics to each side of the back of the mask, so that they can hold on to your ears when wearing it. Make sure to put several layers of clear tape both front and back, and staple the elastics to hold them down firmly. (An 8.5 X 11 sheet of paper will make a mask for a both a child and an adult when folded, though an adult will require much larger elastics for the mask to be comfortable.)

STEP 6: SHARE YOUR WORK

If you share your work online, be sure to tag @polygongallery as we would love to see your personalized face masks.
Join us on Saturday, November 7th, in order to experiment with two more different drawing techniques, while learning how to produce your own masks and zine publication. Hope to see you soon!